Temperature plays a key role in many industrial and commercial processes. Examples include monitoring cooking temperature in food processing, measuring the temperature of molten steel in a mill, verifying the temperature in a cold storage warehouse or refrigeration system, or regulating temperatures in the drying rooms of a paper manufacturer.
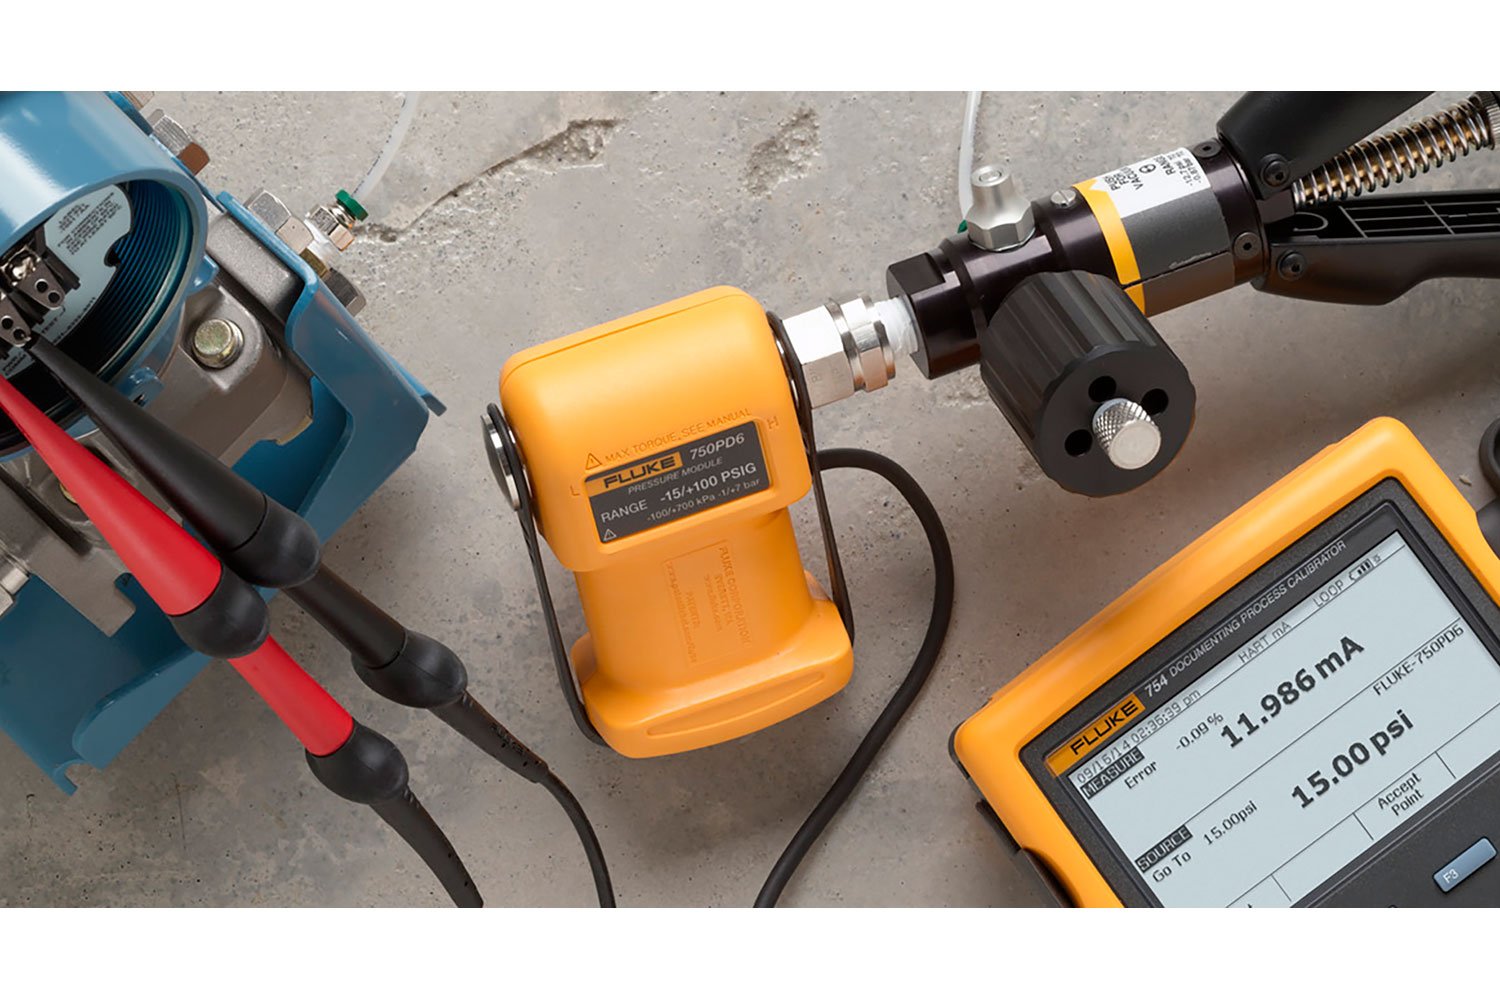
A temperature transmitter will use a measuring device to sense the temperature, and then regulate a 4-20 mA feedback loop to a control element that affects the temperature (Fig. 1). The control element might consist of a valve that opens or closes to allow more steam into a heating process or more fuel to a burner. The two most common types of temperature sensing devices are the thermocouple (TC) and resistive temperature detector (RTD).
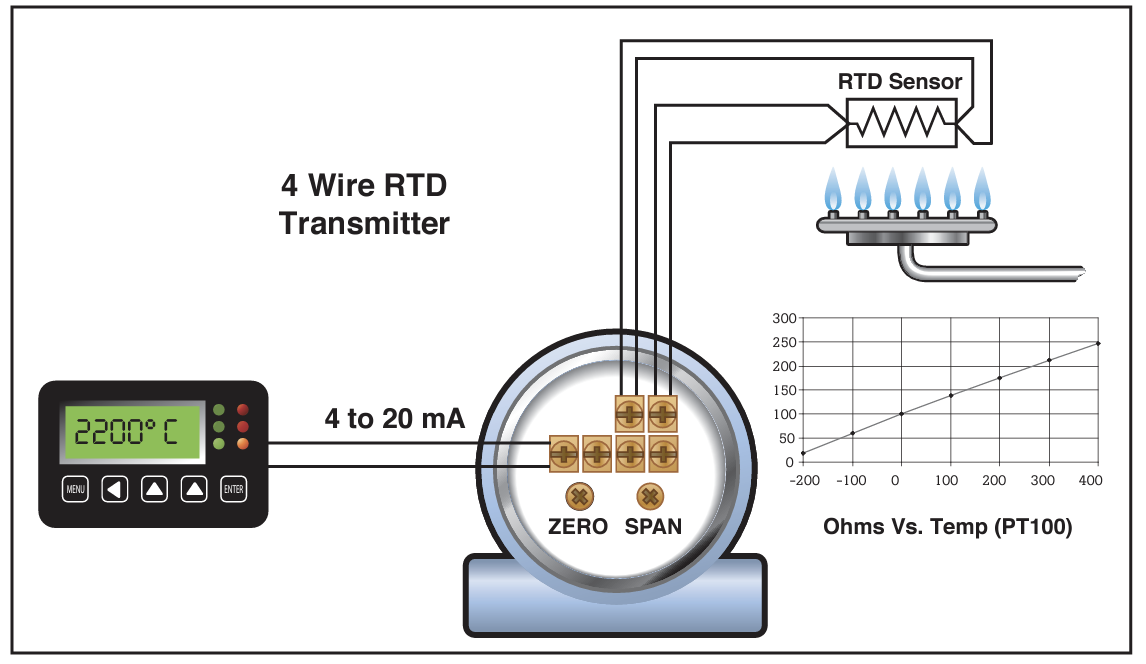
4 Wire RTD Transmitter regulates a 4-20 mA feedback loop to a control temperature effect elements
How to calibrate a Thermocouple input transmitter
The Fluke 724 Temperature Calibrator can provide the three things necessary to calibrate a temperature transmitter. You can source a temperature, provide loop power, and measure the resulting output current. The following example shows how to calibrate a Type K TC transmitter that is ranged from 0-150 degrees centigrade, generating an output current range from 4-20 mA.
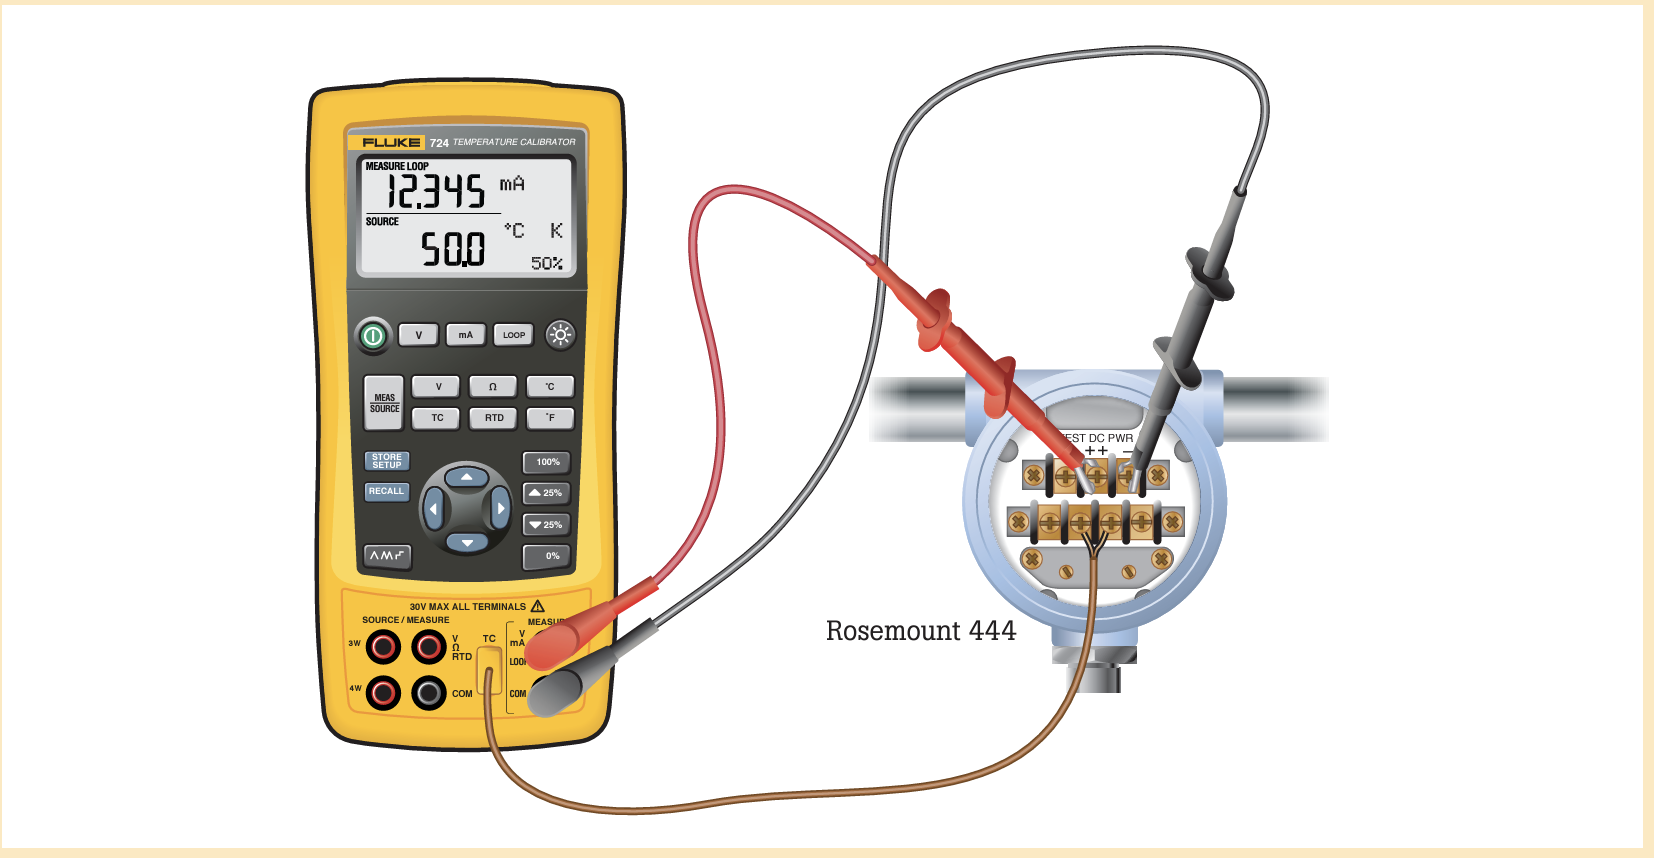
Basic Calibrator Setup
- Connect the 724 test leads to the TC transmitter as shown. The output from the thermocouple jacks on the 724 will simulate a temperature input to the transmitter. The red and black test leads will provide loop power to the transmitter and will measure the current resulting from temperature changes into the transmitter.
- Power on the 724 calibrator. Select the mA button and the LOOP button to select measure milliamps with 24 V loop power applied.
- Press the Meas/Source button until the lower portion of the 724 display indicates the source mode.
- Depress the TC button until a TC type of K is displayed.
- Select the °C button for centigrade.
- Set the Zero Point for this application into the Calibrator. To do this set the display initially to 0.0 °C. You can use the up and down arrow keys to change the output value. Use the left and right arrows to control which decade value of the display is being changed. When the display reads 0.0, hold down the 0 % key on the 724 and observe that 0 % is displayed in the lower right corner of the screen. This establishes the Zero point for calibration.
- Set the Span Point in the Calibrator. Set the display to the desired Span value for calibration. In this example the display should read 150 °C. Depress the 100 % key and observe that 100 % is displayed in the lower right corner of the screen. This establishes the Span point for calibration.
Performing an “As Found” Test
Once you’ve completed the previous steps, you can move on to perform an “as found” test, or the data showing where the instrument is now.
- Press the 0% key; record the applied temperature and the corresponding mA measurement.
- Press the 25%↑ key (2) times; record the applied temperature and the corresponding mA measurement.
- Press the 100% key; record the applied temperature and the corresponding mA measurement.
Calculate the errors for each of the (3) points using the following formula:
ERROR = ([(I-4)/16]-[T/TSPAN])*100
where Error is in % of span,
I is your recorded mA measurement,
T is the recorded temperature and
TSPAN is the temperature input span (100% - 0% points).The error calculation table below shows how to apply the formula to actual recorded measurements.
- If your calculated errors are less than the specified instrument tolerance, the transmitter has passed the As-Found test. If the test has not passed, perform adjustments as necessary.
Adjusting the Transmitter
Once you know where the instrument is at that moment, you can continue to adjusting it.
- Press the 0% key to source the proper temperature for a 4 mA output. Adjust the zero potentiometer until the current reading is 4.00 mA.
- Depress the 100 % key to source the proper temperature for a 20 mA output. Adjust the Span potentiometer until the current reading is 20.00 mA. 15. Depress the 0% key again and adjust the zero potentiometer again if necessary, to get a 4.00 mA output.
Perform an “As Left” Test
Repeat steps 8 through 12 to complete the full calibration procedure on your temperature transmitter.
Temperature transmitter error calculation example
| mA Measurement | TC Source | T Span | Formula | Error (%) |
| 4.02 | 0°C | 150°C | ([4.02-4)/16]-[0/150])*100 | 0.1250 |
| 11.95 | 75°C | 150°C | ([11.95-4)/16]-[75/150])*100 | -0.3125 |
| 20.25 | 150°C | 150°C | ([20.25-4)/16]-[150/150])*100 | 1.5625 |
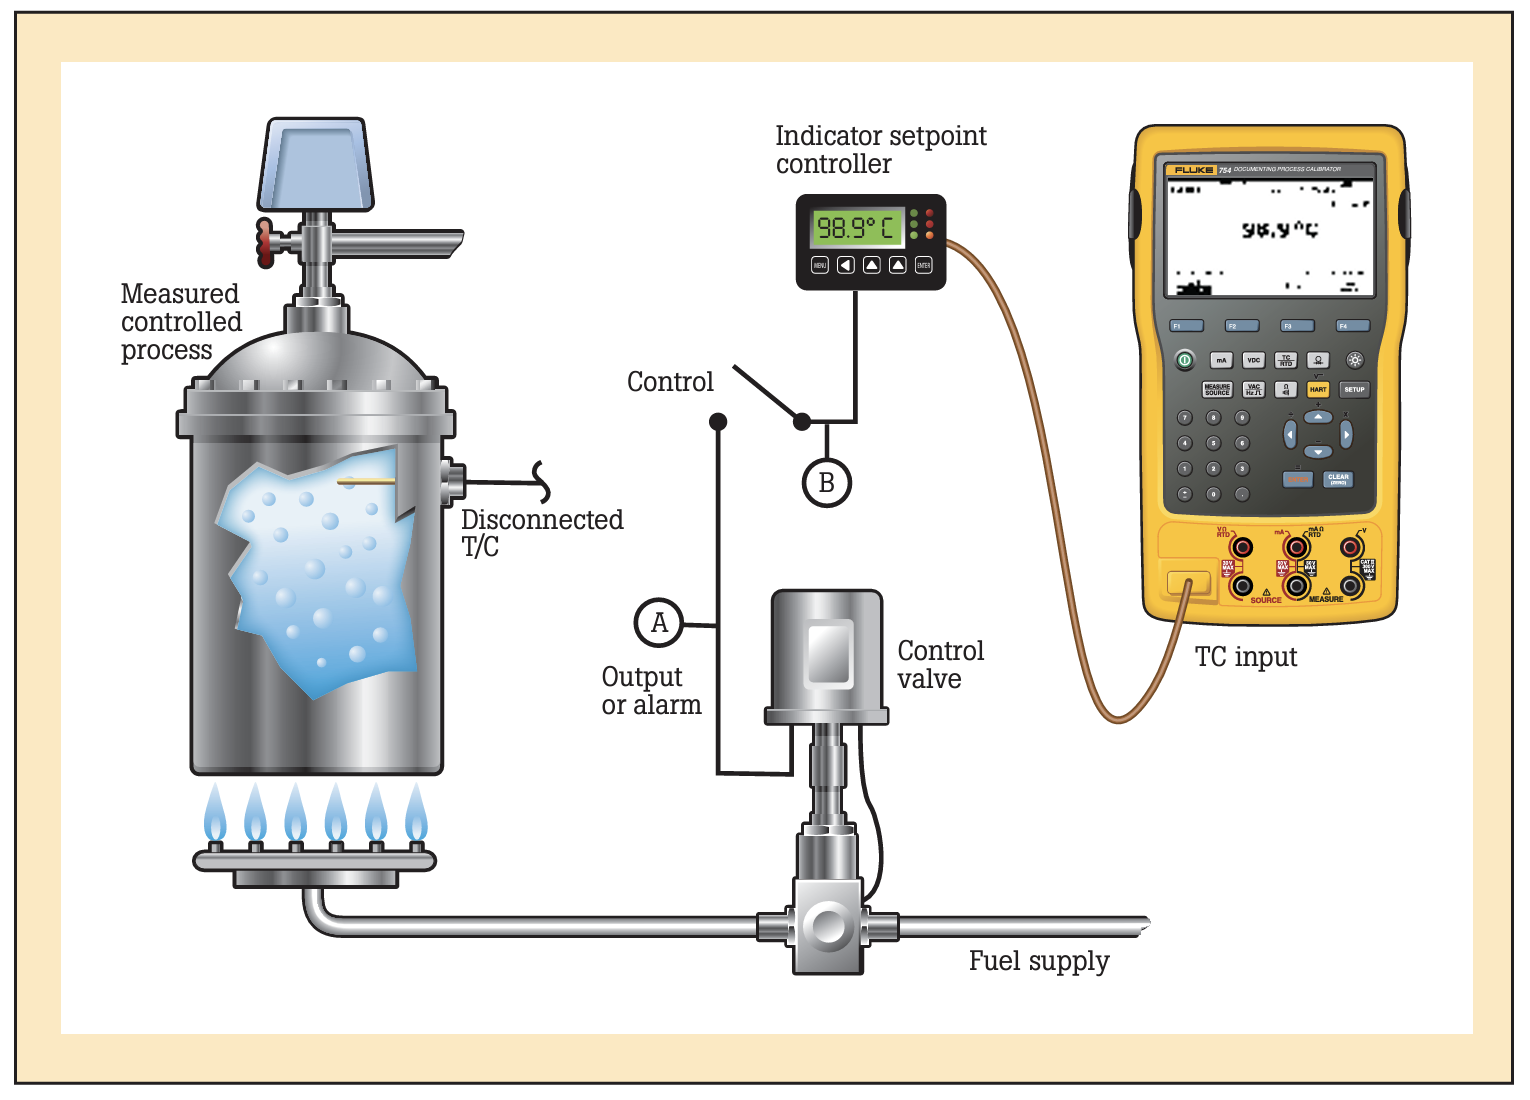
Sourcing temperature, documented indicator verification
The performance of a temperature indicator can be verified by applying a calibrated signal to the sensor input and noting the results. The performance of the indicator can be documented using the 750 series calibrators by entering the indicator value using the keypad.
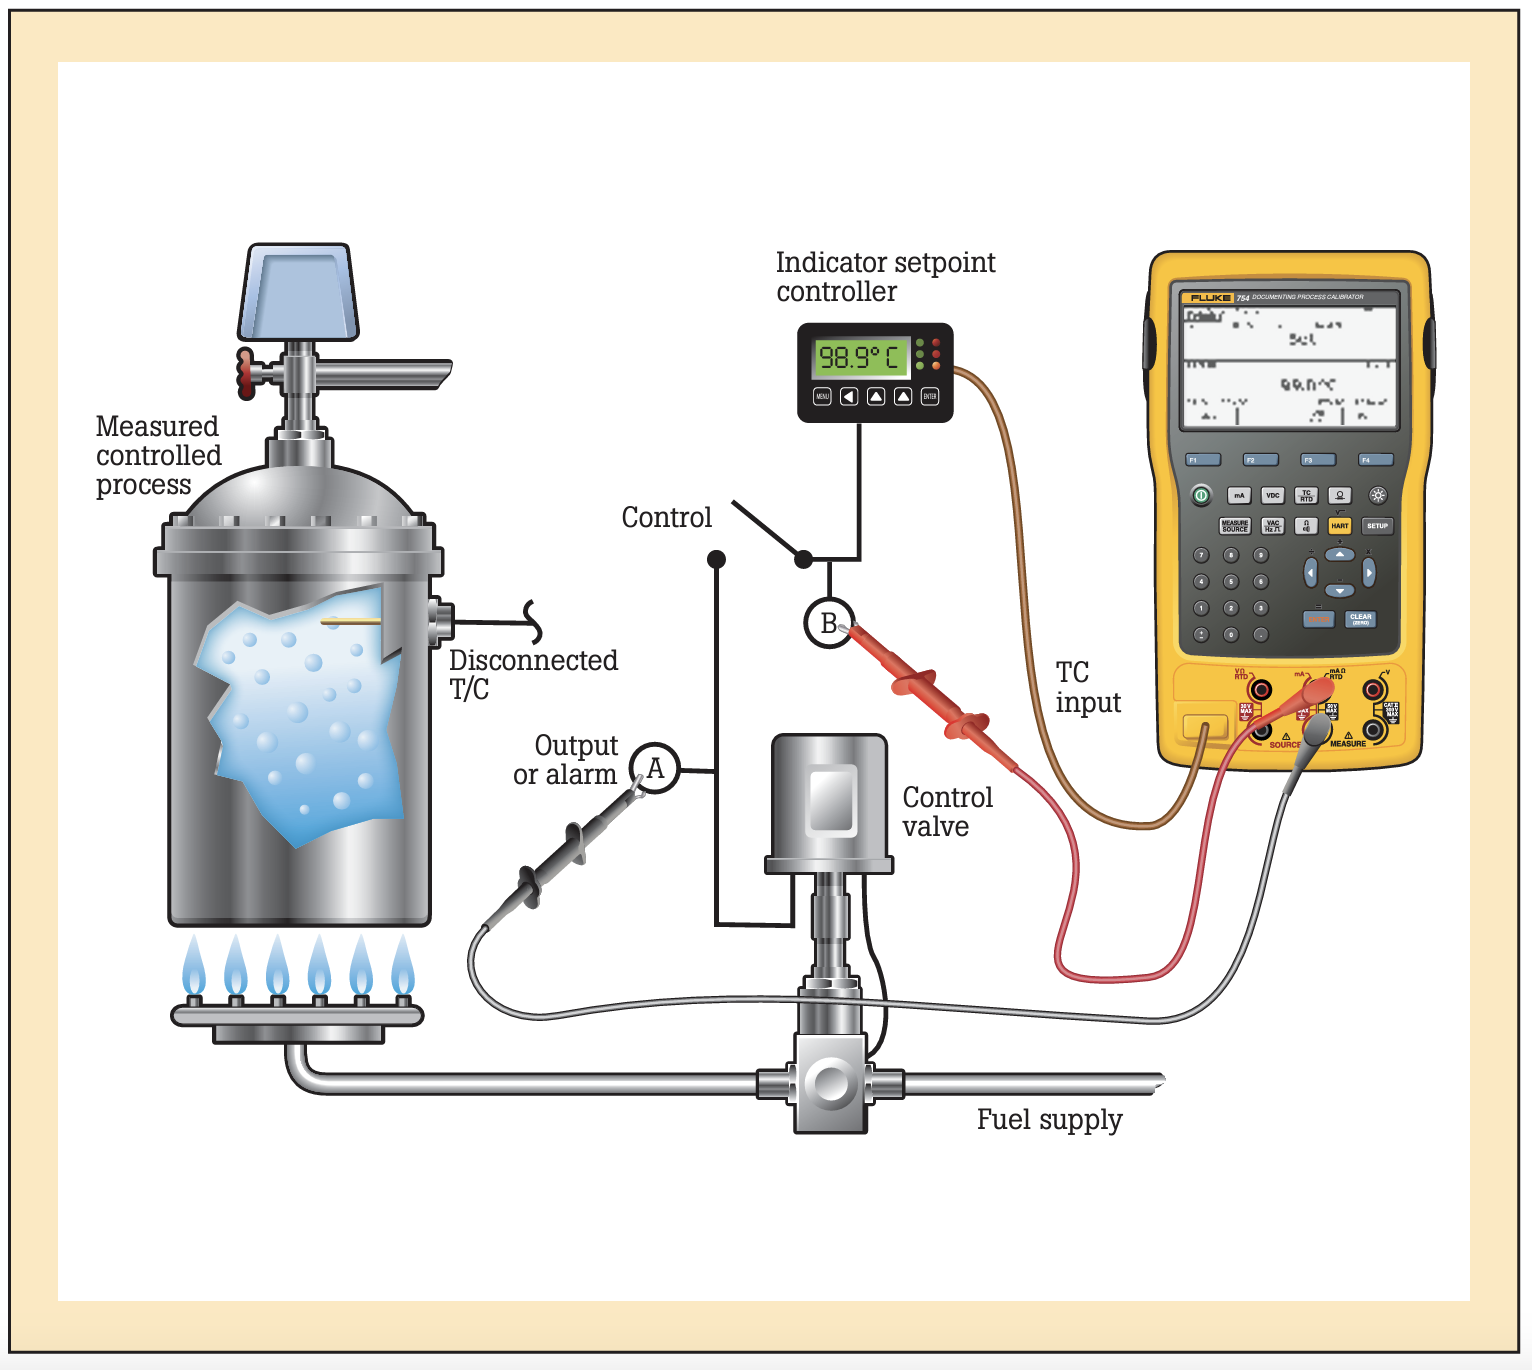
Verifying thermostat or temperature controllers
The performance of a thermostat or temperature controller can be determined by measuring the outputs while applying a temperature signal to the input. In this example, a Fluke 750 series calibrator simultaneously varies the input signal while monitoring contact closure on the output. The calibrator then documents the measured setpoint, reset point and deadband size.
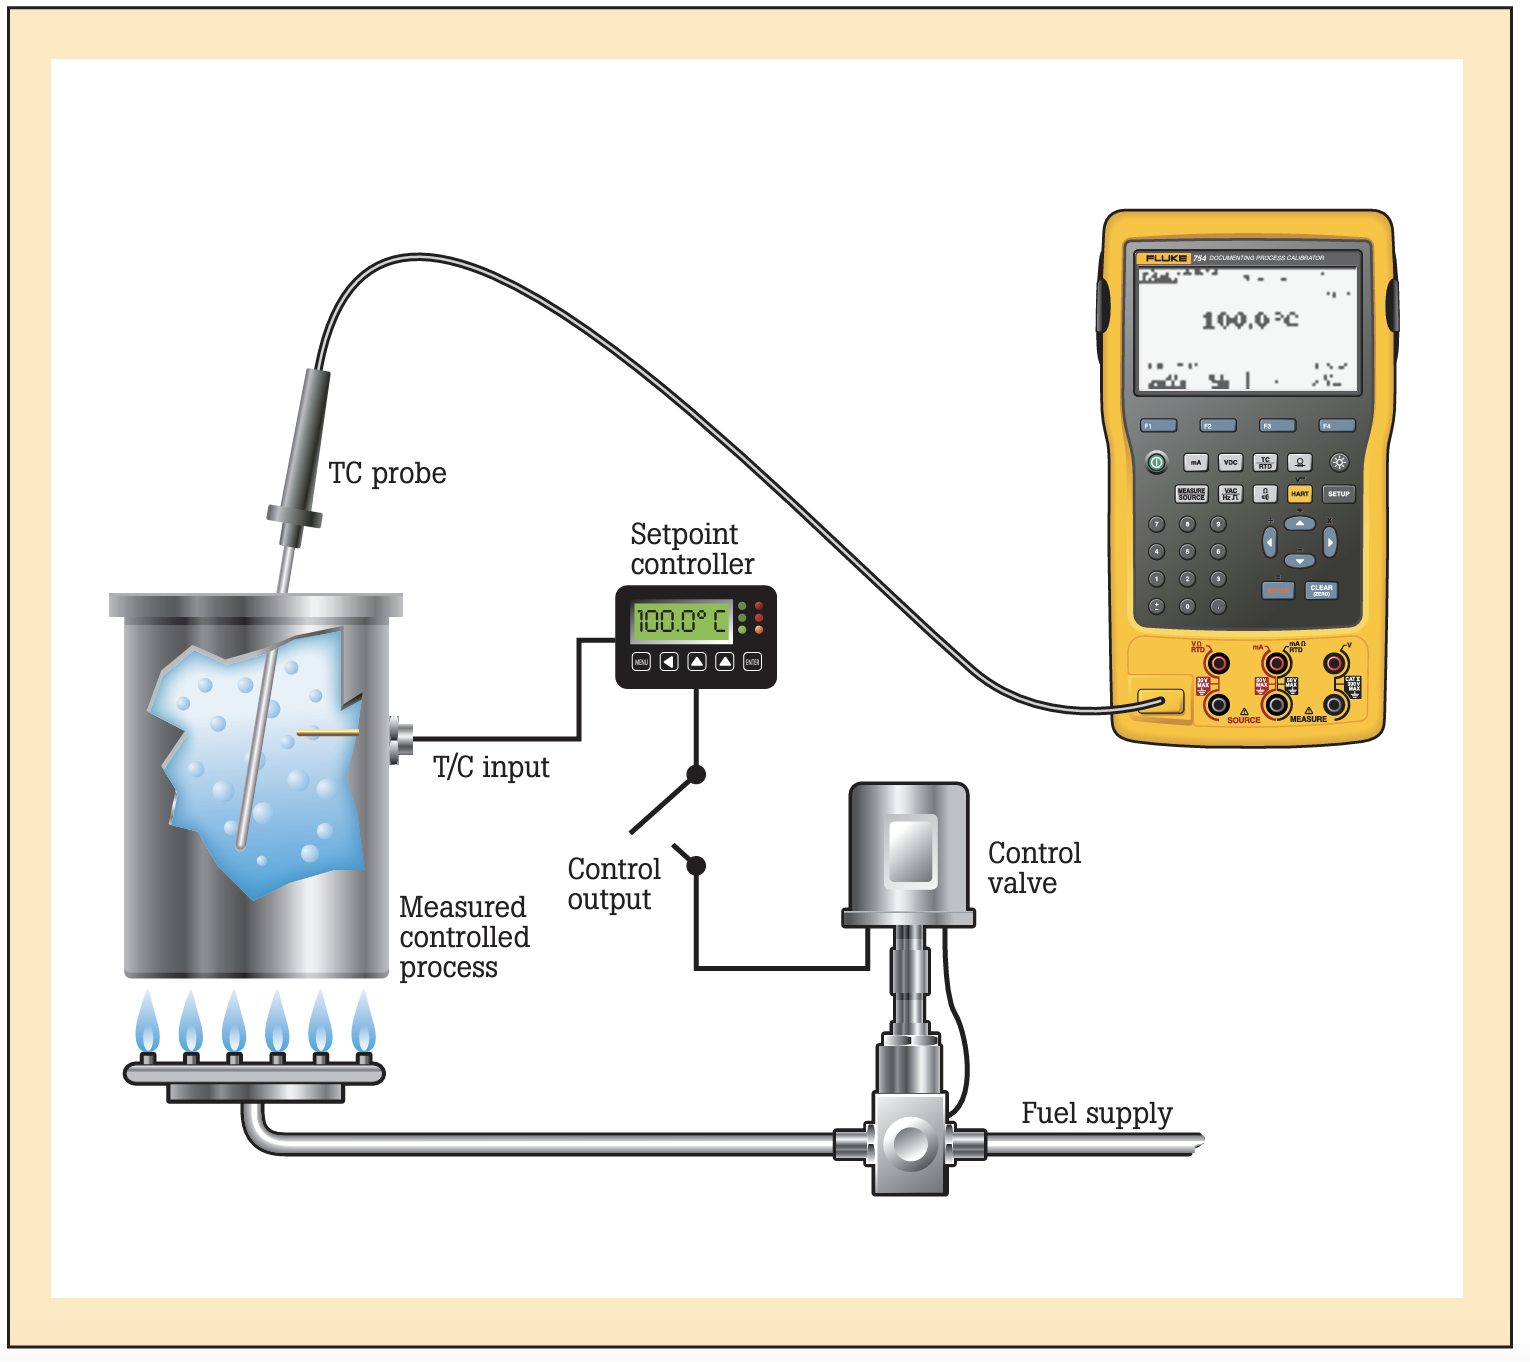
Measuring temperature
Process temperatures can be verified using a temperature calibrator or digital thermometer. In this example, both the controller/indicator and its’ input sensor can be verified at the process operating temperature.
Precision RTD Temperature Measurement
Use characteristic RTD probes with the 726 Precision Multifunction Process Calibrator for enhanced temperature measurement accuracy.
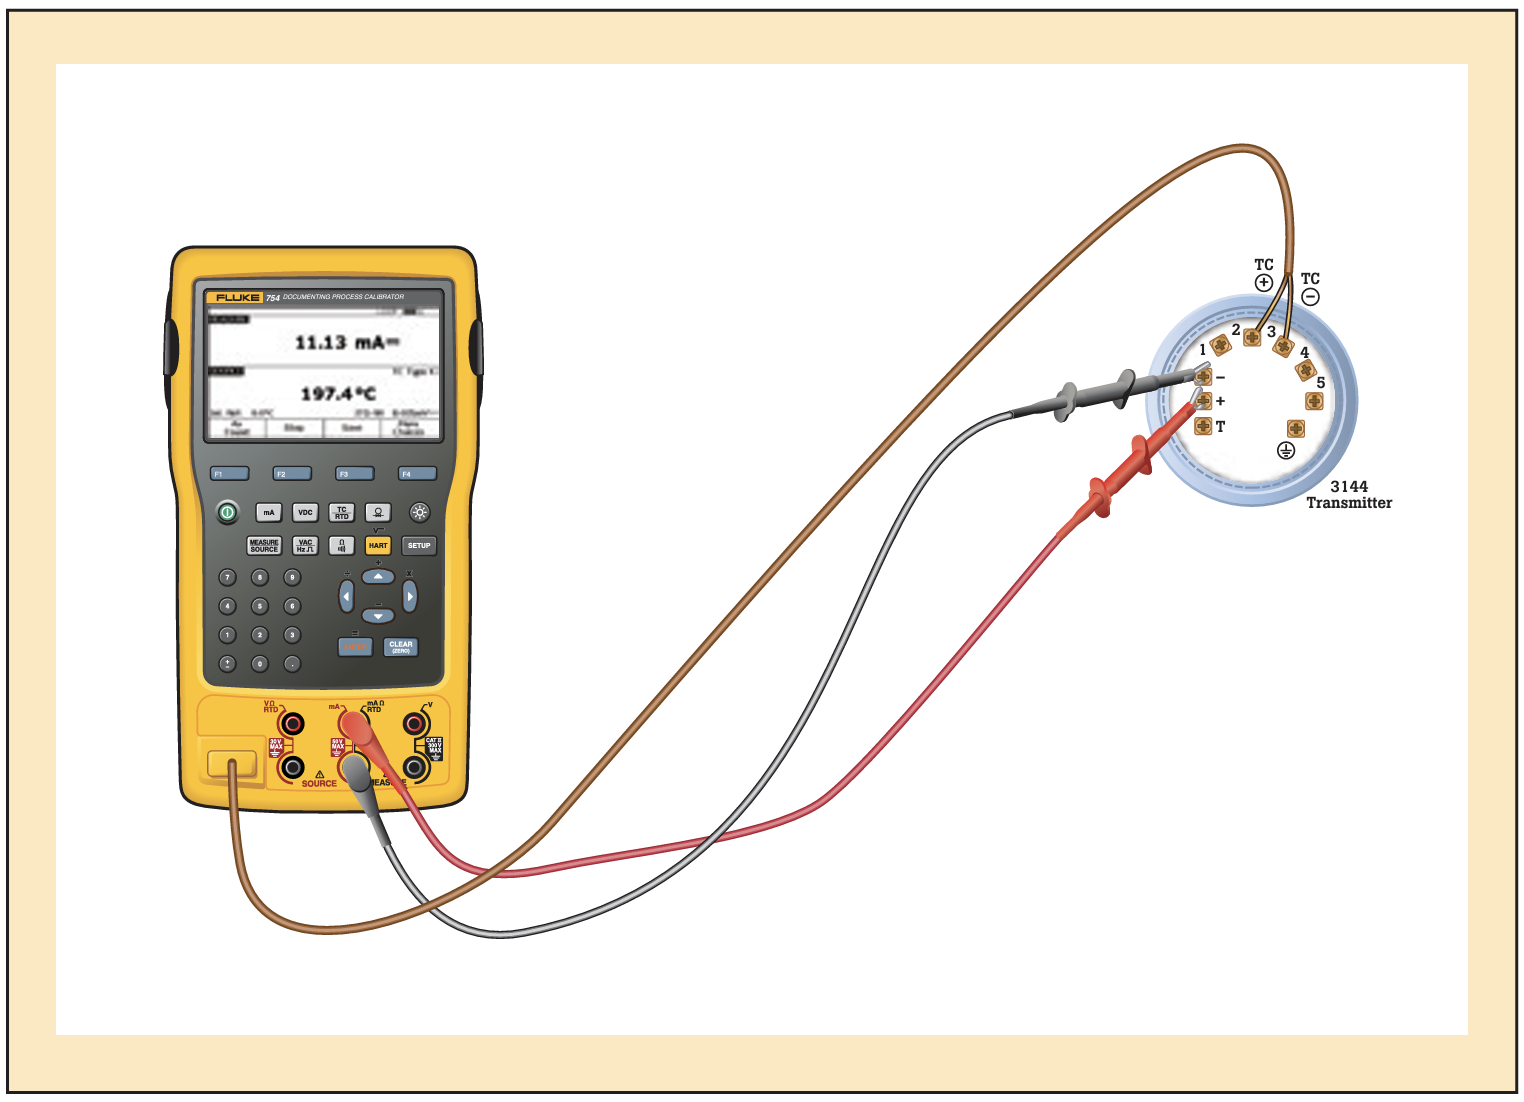
Calibrate a HART temperature transmitter
HART “smart” transmitters require digital adjustment if found to be out of specification. This task requires a precision calibrator and a digital configuration tool. The Fluke 754 shown is connected to a Rosemount 3144 HART temperature transmitter. In this configuration, the 754 applies a T/C simulation signal and measures the mA output and digital PV. If adjustment is necessary, sensor trim, output trim and re-ranging can be performed with the Fluke 754.
Eliminating errors from temperature sensors
In addition to sourcing a voltage or resistance to verify your temperature transmitter or temperature controller you may want to verify your thermocouple or RTD as well. This is especially important for critical instrumentation that could potentially compromise product or process quality if it does not conform to specifications. There are a few reasons you may want a traceable calibration that includes the sensor:
- Eliminate up to 75% of the error in a process measurement
- Conform to health, safety, environment, and other government regulations
- Comply with quality standards such as ISO 9000, which require regular calibration of all quality related equipment
- Reduce waste and improve productivity
- Comply with customer contracts requiring traceability to national standards
- Be certain measurements will be reproduced within known limits of error when instruments are replaced
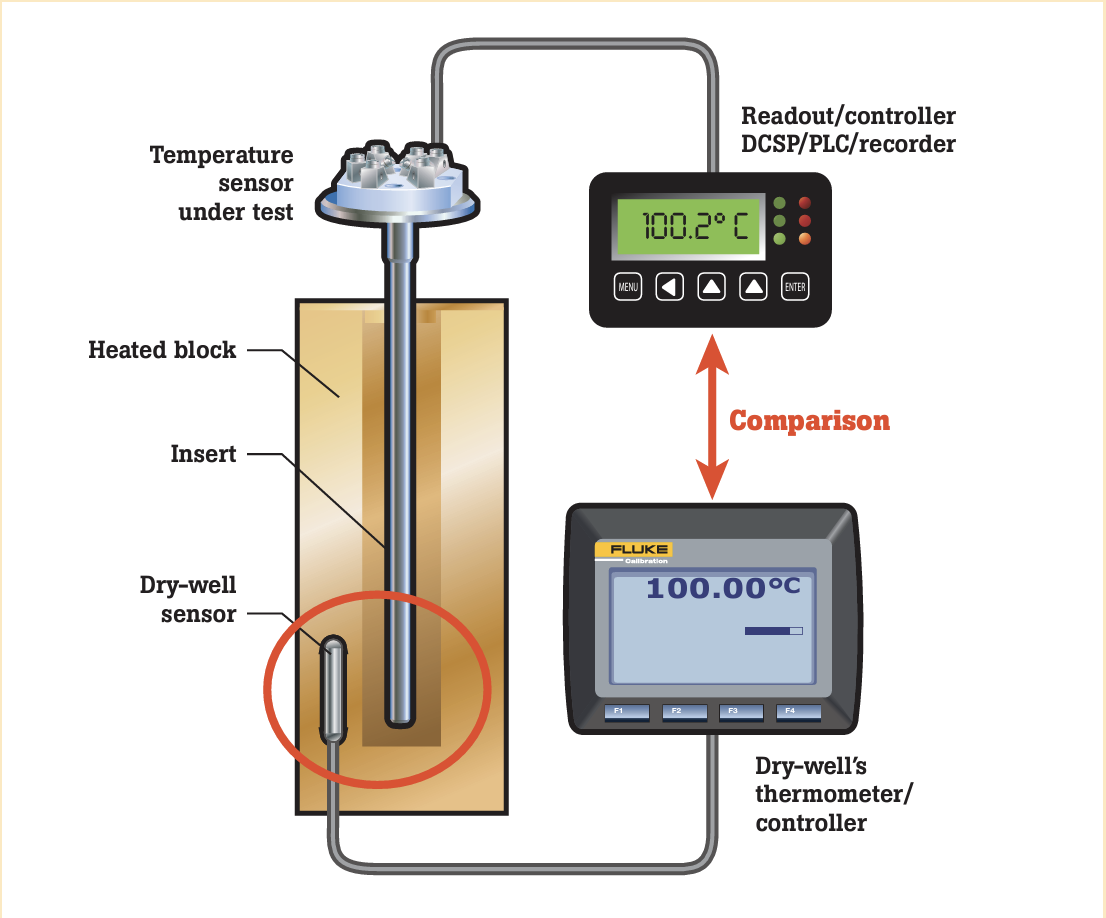
Individual temperature sensor calibration or verification
Another common method is to separate the RTD or thermocouple from the control loop and verify that at each temperature set point the resistance of the RTD or the voltage of the thermocouple conforms to the limits of error expected at each temperature.
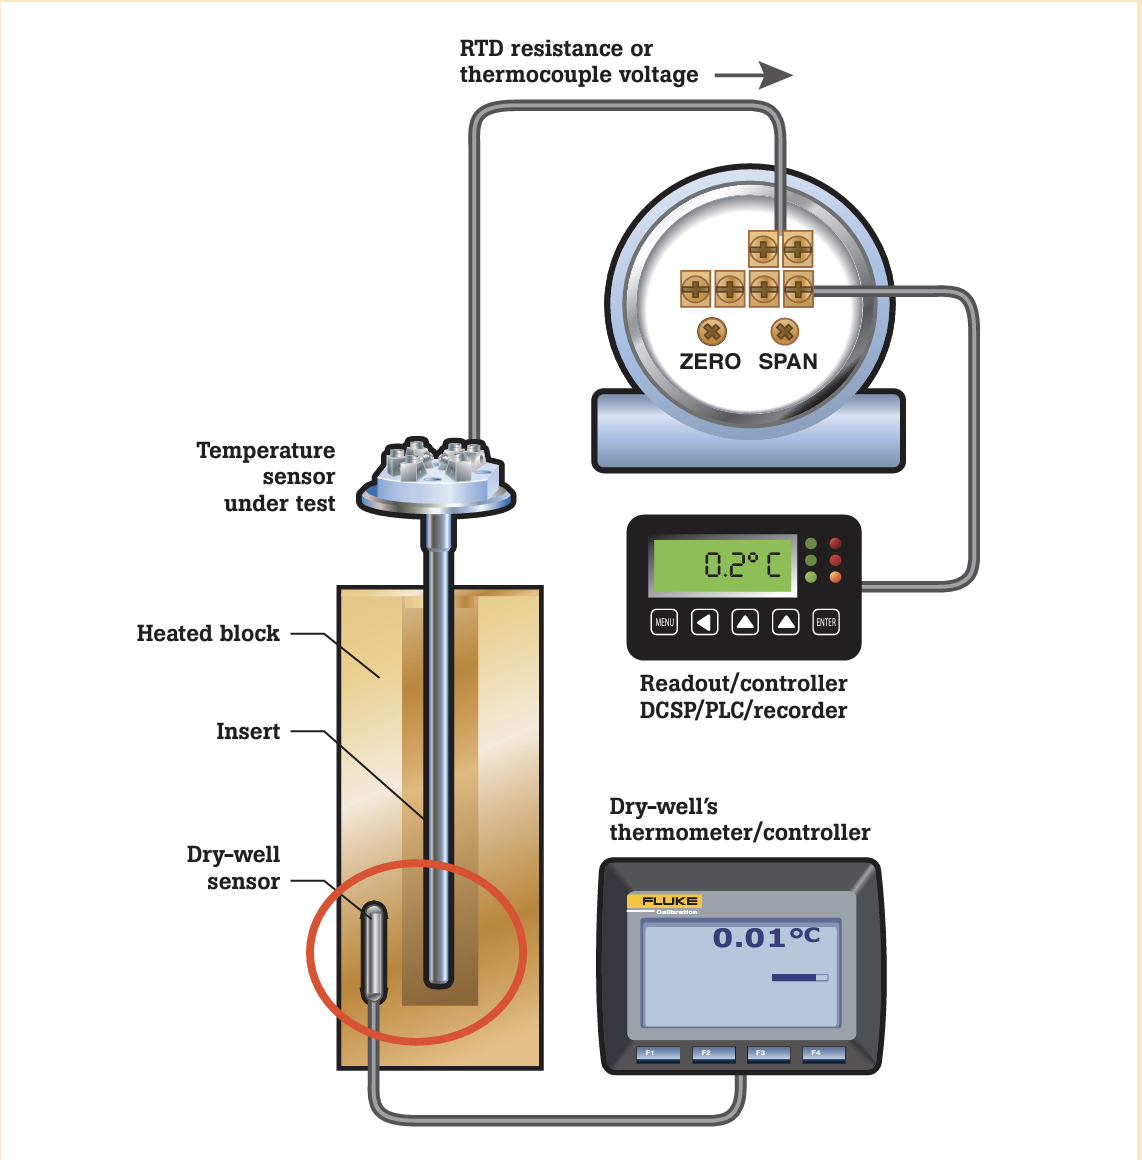
Loop calibration
Including a process temperature sensor Most often temperature sensors are calibrated in the field by removing them from the process and placing them in a reference temperature source such as a dry-block calibrator or portable calibration bath. In a loop calibration the instrumentation remains connected to the control loop and the indicated temperature is read from the display as the actual temperature is read from the reference temperature source.
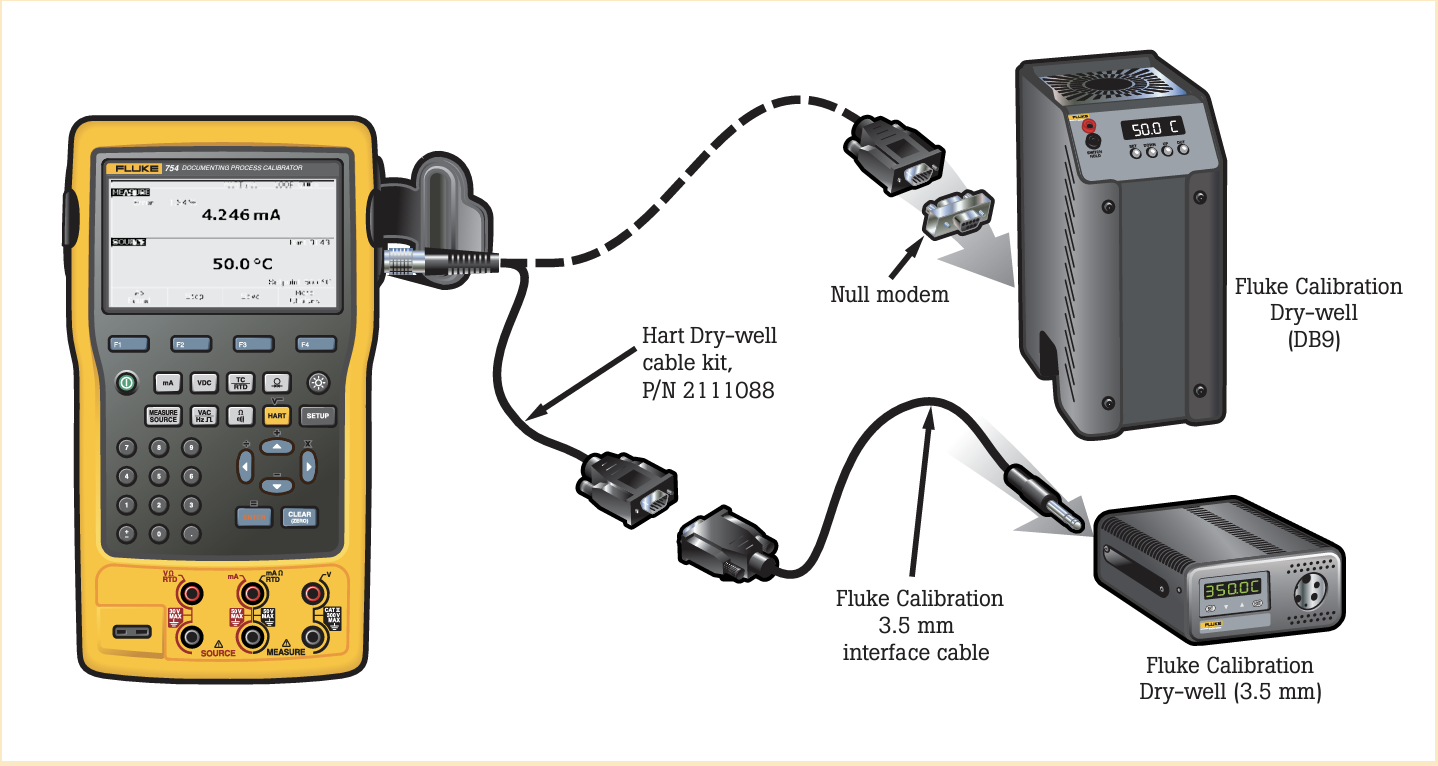
Connecting a Fluke 754 to a Fluke Calibration dry-well
Automating and documenting a temperature calibration that includes a Fluke Calibration temperature source is easily accomplished by connecting it to a Fluke 754.
Temperature terminology
- Dry Block Calibrator: A temperature calibrator that uses a precision oven to source precise temperature. This style of calibrator is often used for the verification of temperature sensors.
- Excitation current: A constant current applied to an RTD probe to determine actual resistance for temperature measurement. Typical values are 2 mA or less to minimize self-heating of the probe.
- IPTS-68: International Practical Temperature Scale of 1968. A temperature standard adopted in 1968 that uses intrinsic standards to define the measurement of temperature.
- ITS-90: International Temperature Scale of 1990. A temperature calibration standard adopted in 1990 using intrinsic standards to make it possible to use and compare temperature measurements in a meaningful way, anywhere in the world.
- Lead Resistance Compensation: A compensation method used with 3 and 4 wire RTDs and resistance measurement. This method negates the error associated with lead resistance when making an RTD measurement.
- Reference Temperature: A reference condition used for comparing measurement results to a standard data set. Examples include 0°C for thermocouple tables, and the triple point of water for the ITS-90.
- R0: The resistance value of an RTD probe at 0°C. Example PT100385, R0 =100 Ω.
- RTD: Resistance Temperature Device, a temperature measurement sensor that has predictable changes in resistance with a change in temperature. The most common RTD is the platinum PT100-385.
- Seebeck Effect: Thermoelectric effect in which the voltage potential increases with temperature (thermocouples) in a junction of dissimilar metals.
- Triple point of water: A defining temperature of the ITS-90 occurring at 0.01 °C when water coexists simultaneously in three states: liquid, solid, and vapor.
Thermocouple types
| Plug Color | Alloys | Temperature Range | EMF Range | |
| + | - | |||
| White B | Pt-30 % Rh Platinum- 30 % | Rhodium Pt-6 % Rh Platinum- 6 % Rhodium | 600 to 1820 °C, 1112 to 3308 °F | 1.792 to 13.820 mV |
| Red C | W-5 % Re Tungsten- 5 % Rhenium | W-26 % Re Tungsten- 26 % Rhenium | 0 to 2316 °C, 32 to 4201 °F | 0 to 37.079 mV |
| Purple E | Ni-Cr Nickel-Chromium (Chromel) | Cu-Ni Copper-Nickel (Constantan) | -250 to 1000 °C, -418 to 1832 °F | -9.719 to 76.370 mV |
| Black J | Iron Fe | Cu-Ni Copper-Nickel (Constantan) | -210 to 1200 °C, -346 to 2193 °F | -8.096 to 69.555 mV |
| Yellow K | Ni-Cr Nickel-Chromium (Chromel) | Ni-Al Nickel-Aluminum | -200 to 1372 °C, -328 to 2502 °F | -5.891 to 54.886 mV |
| Blue L | Fe Iron | Cu-Ni Copper-Nickel (Constantan) | -200 to 900 °C, -328 to 1652 °F | -8.166 to 53.147 mV |
| Orange N | Ni-Cr-Si Nickel-Chromium- Silicon (Nicrosil) | Ni-Si-Mg Nickel-SiliconMagnesium (Nisil) | -200 to 1300 °C, -328 to 2372 °F | -3.990 to 47.514 mV |
| Green R | Pt-13 % Rh Platinum- 13 % Rhodium | Pt Platinum | -20 to 1767 °C, -4 to 3213 °F | -0.101 to 21.089 mV |
| Green S | Pt-10 % Rh Platinum- 10 % Rhodium | Pt Platinum | -20 to 1767 °C, -4 to 3213 °F | -0.103 to 18.682 mV |
| Blue T | Cu Copper (Constantan) | Cu-Ni Copper-Nickel | -250 to 400 °C, -418 to 752 °F | -6.181 to 20.873 mV |
| White U | Cu Copper | Cu-Ni Copper-Nickel | -200 to 600° C, -328 to 1112 °F | -5.693 to 34.320 mV |
F to C Temperature conversions
